


 İnstagram
 Facebook
The Truth About Transforming Your Concrete Floor: What to Expect and How to Avoid Costly Blunders
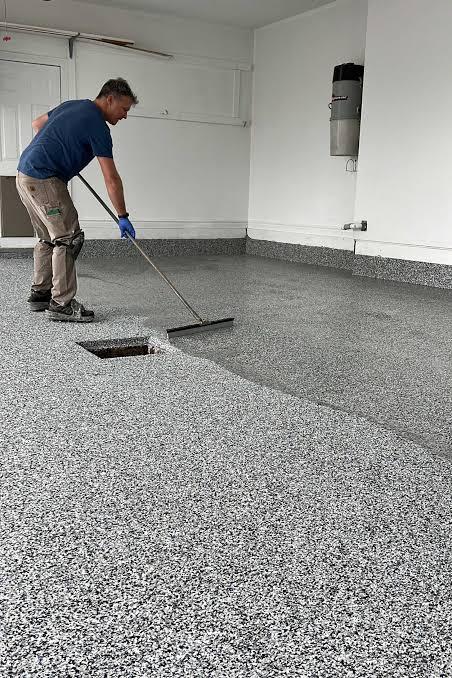
Most homeowners ignore the garage floor until it becomes impossible to overlook. It starts with a small oil stain near the lawnmower, progresses to a hairline crack near the door, and eventually turns into a dusty, pitting mess that tracks grey powder into your clean hallway. Your garage serves as a workshop, a storage hub, and the primary entrance to your home, yet its foundation takes a beating every single day from heavy vehicles, dropped tools, and fluctuating temperatures.
Living in the Greater Toronto Area complicates matters further. Concrete handles weight relatively well, but it struggles with moisture and extreme temperature swings. Ontario winters bring a brutal cycle of freezing and thawing, aggravated by the road salt and slush dripping from your wheel wells. This harsh environment accelerates concrete degradation, turning minor surface imperfections into deep structural flaws. Leaving the surface bare invites trouble, which is why a protective barrier is practically essential for local homes.
Why Ontario Garage Floors Degrade So Quickly
The climate in Southern Ontario places immense stress on residential concrete structures. During January and February, temperatures routinely drop well below freezing, only to bounce back above zero during brief thaws. When snow melts off your car, the water seeps into the microscopic pores of unprotected concrete. When the temperature drops again overnight, that trapped water freezes and expands, fracturing the internal bonds of the slab.
Road salt compounds this damage. Sodium chloride lowers the freezing point of water, increasing the frequency of the freeze-thaw cycle within the concrete itself. Over a few seasons, this chemical and physical assault causes the top layer of your floor to flake away, a process known as spalling. Beyond the weather, bare concrete is highly porous, meaning it acts like a giant sponge for automotive fluids, chemical spills, and moisture rising up from the ground underneath the foundation.
Upgrading the surface provides a shield against these elements. A proper sealant stops water penetration, eliminates the dust generated by friction on bare concrete, and makes cleaning up oil or chemical spills as simple as using a rag. It also brightens the entire space by reflecting overhead lighting, transforming a dark, dingy storage area into a functional, clean extension of your living space.
Evaluating the Options: Epoxy vs. Polyaspartic Coatings
When researching coatings, you will find several distinct chemical formulations, each with specific performance traits. Understanding these differences prevents you from choosing a material ill-suited to your daily routine or local climate constraints.
Traditional epoxy garage floor coating products have served as the industry standard for decades. Epoxy consists of a resin and a hardener that, when mixed, create a thick, durable bond with the concrete. It offers excellent resistance to impacts and chemical stains, making it ideal for spaces that host heavy DIY projects. However, standard epoxy cures slowly, often requiring several days before you can park your vehicle on it. It is also sensitive to temperature during application, meaning it can rarely be installed during cold Ontario winters.
+------------------------+-------------------------------------+-----------------------------------------+
| Coating Feature        | Traditional Epoxy                   | Polyaspartic / Polyurea                 |
+------------------------+-------------------------------------+-----------------------------------------+
| Cure Time              | 3 to 5 days before vehicle use      | 24 hours for full vehicle traffic       |
| UV Resistance          | Tends to yellow over time in sun    | Highly stable; will not discolor        |
| Installation Window    | Restricted to warm, dry weather     | Can be applied in sub-zero temperatures |
| Flexing Ability        | Brittle; can crack if concrete shifts| Flexible; moves with minor slab shifts  |
+------------------------+-------------------------------------+-----------------------------------------+
Polyaspartic and polyurea coatings represent a newer generation of floor protection. These materials cure rapidly, often allowing homeowners to return their cars to the garage within twenty-four hours. They remain highly flexible, meaning they can accommodate the slight shifts and vibrations of your concrete slab without cracking. Furthermore, polyaspartics resist UV damage, meaning they will not turn a yellow or amber hue when exposed to the sunlight streaming through an open garage door. The primary drawback is cost, as the raw materials and specialized equipment needed to apply them carry a premium price tag.
The Step-by-Step Installation Process
Achieving a flawless finish requires systematic preparation and precise execution. A coating is only as reliable as the concrete bond beneath it, which makes the initial stages of the project critical to long-term success.
1. Assessment and Moisture Testing
Before mixing any chemicals, an installer must check the health of the slab. This involves checking for previous sealers and performing a moisture test. High hydrostatic pressure—where water vapor pushes upward through the concrete from the dirt below—will cause any coating to bubble and peel away over time. If moisture levels are too high, a specialized mitigating primer must be applied first.
2. Surface Profiling
Smooth concrete cannot hold a heavy-duty coating. Contractors use heavy walk-behind diamond grinding machines or shot-blasters to open up the pores of the concrete. This process removes old paint, grease, and weak top layers of cement, leaving behind a texture that feels roughly like medium-grit sandpaper. This rough profile allows the base coat to mechanically lock into the floor.
3. Crack and Pit Repair
Once the floor is ground clean, all cracks, pits, and spalled areas become visible. Installers use fast-curing epoxy or polyurea gel fillers to pack these imperfections. After the filler hardens, they grind the surface flat again to ensure the patch sits perfectly flush with the surrounding floor.
4. Base Coat Application
The floor is thoroughly vacuumed to remove every speck of dust. The base coat is then mixed and spread across the floor using squeegees and rollers. This coat penetrates deep into the freshly opened concrete pores. If a multi-colored chip finish is desired, the vinyl flakes are broadcast into this wet base coat until the floor is completely saturated.
5. Scraping and Top Coat
The next day, the excess loose flakes are swept up. A flat blade scraper is run over the floor to flatten out any protruding edges of the flakes, creating a uniform texture. Finally, a clear protective top coat is rolled over the surface. This layer locks down the flakes and provides the final barrier against chemicals, scratches, and hot-tire pickup.
What Does a Quality Coating Cost in the GTA?
Pricing for professional floor finishes varies significantly based on the condition of your concrete and the size of your space. Homeowners in Toronto, Mississauga, and Scarborough should expect pricing to reflect local labor rates and material availability.
For a standard two-car garage measuring roughly 400 square feet, professional installation generally ranges between $2,400 and $4,500. This translates to roughly $6 to $11 per square foot. Single-car garages often carry a slightly higher price per square foot because the fixed costs of transport, equipment setup, and travel remain the same regardless of floor size.
Several factors drive these costs up or down:
-
Concrete Condition: Slabs with deep cracks, pitting from road salt, or old oil saturation require intensive grinding and extensive patchwork, increasing labor times.
-
Previous Coatings: If your floor has an old, peeling DIY paint layer or an old sealer, removing it completely adds extra hours to the diamond grinding phase.
-
Material Choice: Full-broadcast flake polyaspartic systems cost more than simple solid-color epoxy coats due to material volume and speed of installation.
-
Accessibility: Complex layouts with multiple steps, tight corners, built-in cabinetry, or vertical stem walls require meticulous hand-grinding, which adds to the final estimate.
How to Vet Floor Contractors and Avoid Scams
The home improvement market contains plenty of fly-by-night operations making lofty promises. Protecting your investment means knowing how to spot red flags and what questions to ask during the consultation phase.
Always ask potential contractors about their floor preparation methods. If a company tells you they simply acid-wash the floor or use a pressure washer before applying the product, politely decline their services. Acid washing rarely etches concrete deeply enough for commercial-grade coatings, and it introduces massive amounts of water into a porous floor, leading to premature peeling. True professionals rely on diamond grinding machinery to prepare the substrate.
Inquire about the specific products they plan to use. Request technical data sheets rather than relying on marketing brochures. A reputable team, such as revivepainting, will clearly explain the solids content of their coatings and why a particular system suits your garage's daily usage patterns.
Be sure to ask about the warranty terms. A lifetime warranty sounds appealing, but you must read the print carefully. True floor warranties protect against product delamination and peeling caused by material failure, but they rarely cover cracks caused by major settling of the house foundation or hydrostatic water pressure from beneath the slab. Make sure you get a written copy of the warranty that details what is covered and who handles the labor costs if a repair becomes necessary.
Warning Signs That Your Floor Needs Immediate Attention
Concrete degrades gradually, but waiting too long to address warning signs can turn a simple surface refurbishment into a costly, full-slab replacement project. Catching issues early saves time and money.
+-------------------------+---------------------------------+------------------------------------------+
| Visible Sign            | Underlying Issue                | Risk of Delaying                         |
+-------------------------+---------------------------------+------------------------------------------+
| Fine White Powder       | Efflorescence (Moisture push)   | Destroys concrete structure from within  |
| Flaking Surface Layer   | Spalling from freeze-thaw damage| Deep pitting requiring heavy mortars     |
| Widening Cracks         | Foundation shifting or settling | Water seepage eroding the sub-base earth |
+-------------------------+---------------------------------+------------------------------------------+
Keep an eye out for a fine, white powder forming on the surface of your concrete, a phenomenon known as efflorescence. This powder occurs when moisture migrates through the slab, dissolving minerals along the way and leaving them behind as it evaporates. It indicates a moisture management issue that needs fixing before any best garage floor coating can be laid down
Another clear warning sign is spalling, where the smooth top layer of the concrete flakes off to reveal a rough, aggregate-heavy texture below. Once spalling begins, the exposed interior of the concrete is even more porous than the surface, accelerating the rate of freeze-thaw destruction during the next winter. Similarly, cracks wider than a nickel should never be ignored. These openings let water run straight under your slab, which can wash away the supporting soil and cause the floor to drop, crack further, or tilt unevenly.
DIY Kits vs. Professional Application: A Realistic Comparison
The aisles of local home improvement big-box stores feature plenty of affordable, consumer-grade DIY paint kits. While the low price tag is tempting, it is important to understand what you are actually purchasing and why these kits behave differently than industrial systems.
DIY kits usually contain water-based epoxies with low solids content, often around 40% to 50%. This means that as the floor dries, half of the product evaporates into the air, leaving behind a very thin film on the concrete. These thin coatings lack the strength to withstand hot-tire pickup—a common issue where hot tires from a driven car cool down on the floor, contract, and pull the paint right off the concrete surface.
Professionals utilize 100% solids materials that cure via chemical reaction rather than evaporation. What goes onto the floor stays on the floor, resulting in a thick, exceptionally durable shield.
The biggest differentiator, however, is the prep work. The average homeowner lacks access to a three-hundred-pound diamond grinder hooked up to an industrial dust-collection vacuum. Attempting to prep a floor with a small hand sander or consumer-grade chemicals rarely yields the profile required for a long-lasting bond. DIY projects make sense if you are working with a tight budget, plan to move soon, or possess experience with concrete tools. If you intend to stay in your home for many years and want a garage floor coating that stands up to heavy use and road salt, hiring an expert is generally the more economical choice over the long term.
Maintaining Your Investment for the Long Haul
Once your garage floor has been properly treated, looking after it takes minimal effort, but consistent upkeep preserves the high-gloss look and prevents premature wear.
For day-to-day cleaning, sweep up loose dirt and grit regularly. Small pebbles and sand act like sandpaper under car tires, slowly dulling the clear top coat over several years. For a deeper clean, mop the floor with a mixture of warm water and a mild, non-acidic cleaner like Dawn dish soap or a specialized pH-neutral floor cleanser. Avoid using citrus cleaners, vinegar, or harsh bleach, as these acids can slowly etch the surface layer and diminish its glossy finish.
If you enjoy working on vehicles, wipe up fluid leaks quickly. While high-grade coatings easily resist oil, brake fluid, and gasoline for short periods, letting these aggressive chemicals sit on the surface for weeks can eventually soften the top coat. For stubborn scuffs or winter salt crust buildup, scrub gently with a soft-bristled brush and rinse with a garden hose, using a foam squeegee to push the excess water out the door.
Investing time into selecting the right materials and ensuring meticulous preparation guarantees a surface that easily withstands Ontario's challenging climate. For beautiful results and long-term durability, it is worth consulting with specialists who understand how to apply that will look great and protect your home for decades.

 Türkçe
 Arabic
 Deutsch
 Russian